Thursday, December 6, 2012

Holiday Magnets / Sensory Processing Disorder


 You are probably thinking, what a strange title for these magnets? But, I promise you it will all make sense!
                            Sensory Processing Disorder 

 We receive and perceive sensory input through sights, sounds, touch, tastes, smells, movement, balance, body position and muscle control.  Many children who have been diagnosed with Asperger's or Autism, have some level of this disorder.  For further information: http://www.sensory-processing-disorder.com/index.html 


Take some time to explore this site for more of these “behaviors” and to find the reasons why this apparent “chaos” actually makes perfect sense. Through this site, you will finally begin to understand - or further understand, why your child does the things he/she does.  Sensory Integration Disorder is a neurological disorder.


                  Presley's Parents, brother, Aunts and cousins walking for Autism Speaks.
                                        Orlando, FL  11/20/2012


Presley my grand daughter, should have material which is not smooth so she can feel the textures.  Feeling textures builds up /stimulates her touch sensors.  If you have or know of children with this disorder/Autism, this makes a great gift for them!! Check with their parents first, as they may be hypersensitive to textures.

Using my Bosskut Gazelle machine, I cut thick magnet vinyl.  Betsey, a Gazelle owner on our forum, suggested buying magnetic air vent covers from your local hardware store.
These are thicker than regular magnet material and my Gazelle cut it without a problem!!  Materials used was faux football vinyl, thick mulberry paper, and glitter paper.  A word about the glitter paper I used; it is covered with a sealant and doesn't flake. This paper is gorgeous and cuts well!  All the materials used are textured and Presley will love playing with these, feeling them and hopefully not eat them!   Further directions available on the Fall Pumpkin post from last month.


Happy Holidays!   Judy Tesla- Stark   "Proud Grandmother" of Miss Presley!!!  


Snow Days Card

 
A card I made for the holidays using the free Funtime snowman with tree file. ( in your Bluebook)  I added the snow and title to the file and the extract white from black feature using my Funtime software.  I then added a background mat and ice cycles.  Cut this with my Bosskut Gazelle using 85 wgt cardstock, settings at K/O 15, force and speed at 2. I then added my glitter to the snow and ice cycles and my card is done!  


Happy Holidays!
Judy Stark


Monday, December 3, 2012

Reindeer Cookie Holder by Judy Stark


Who doesn't love to receive freshly baked cookies during the holidays? Especially with cute red nosed reindeers peeking at you. Perfect gift to put in a box for your children's holiday party, gifts for your neighbors and family. This newly released digital file is easy to assemble.


After I cut my cookies holders using my Bosskut Gazelle, I found a box pattern and adjusted the size I needed. I used the Swirly Holiday Tree design to decorate the front of my cookie box for gift giving.


Remember, you probably shouldn't use glitter on the cookie holder since you are using a food product.
Happy Holidays to all!

Judy Tesla-Stark


Friday, October 26, 2012

Pumpkin Magnet Fall Card


                                     PUMPKIN MAGNET Fall Card


Supplies needed: Magnet back vinyl, adhesive, cardstock and ribbon. Since I used a dimensional plain color paper, I used my Copic markers to color.

I used files:  O’Hanna corners, oak leaf and maple leaf.

 I wanted the bubbles and designs to make my pumpkin more realistic so I used a non-porous paper with the bubbles and colored the backside. You want to use alcohol based markers or paint so the color won’t slide off.
You will need to cut the file twice. One using magnet vinyl and the other in cardstock to cover the magnet.


I colored the backside of this, which was white.  You can find these textured papers easily online or at your local scrapbook store.

 
I used thick mulberry paper for the leaf on the pumpkin. 


I then cut my corner leaves, title and O'Hanna Corner frames.  Note: Only glue the sides and bottom of the O'Hanna frames as you are using these for a pocket.  My pumpkin is 4.75 by 4 inches.  My card front 5.5 by 5.5 inches.


 After adding the ribbon, your card is completed!  You could also stamp a sentiment onto the pumpkin or use the pencil feature on your machine.  So hopefully, the card goes into a drawer and the magnet on a board or refrigerator.  Enjoy!   Judy Tesla Stark -

Sunday, October 21, 2012

PUMPKINS Layout By Judy S.


  It is finally Fall'ish in Florida and I am loving it!!  This layout is a mixture of digital and regular scrapbooking.  The picture of my grandchildren has so many colors and finding the right paper just wasn't that easy.  So, I decided to print one from my Craft Artist software. The background paper and frame is from the Thanksgiving kit.  Once printed, I am ready to put my layout together.


 I used the Pumpkin by Phyllis Parkins, the newly released Pilgrim hat and maple leaf .  The fence is by Debbie Gromett.   I also cut my title using the Funtime software and Gazelle. 


The Bosskut Gazelle has a fabulous Print n Cut feature and I used it for the Scarecrow and crows. I purchased those designs at www.Dollardoodles.com by Cheryl Seslars and Alice Smith.


So my Pumpkin layout has Digital scrapbooking, Print n Cut Digital and regular cut scrapbooking! 


Happy Fall everyone and thank you for stopping by my Blog.


Judy Tesla Stark - Bosskut Design Team


Monday, October 15, 2012

Turkey Front with Title by Judy Stark


I needed a Fall Layout for a large bulletin board and the newly released Turkey was perfect! I made this for a friend and she will add other items to the board. Cutting this Turkey file with my Bosskut Gazelle only took a few minutes. I chalked out the cutting lines on my turkey with a marker. Chalked out the mats with regular chalk. Turkey is 7.5 wide by 8.5 tall. I then cut the Bosskut oak leaves and added to the bottom. I also colored the cutting lines with a marker and then added 1 application of the liquid embossing.


To make my title, I used my  Funtime program.   After deciding on which font I wanted, I then used my outline feature to make the mat.  Just a push of a button!


    After chalking the mat, I added the Curly Scrolls by Phyllis Parkins and an Oak leaf.

Judy Stark

Friday, October 12, 2012

"BOO" Halloween Layout by Judy S


  Halloween is 2 weeks from now and it is time to get my layouts done and make treat bags!! 

  I used quite a few different designs for this layout.

Files used: 

  BK Ghost Pumpkin, Broom Flying Witch, BK Candy Apple, Treat Bag, Corner Spider Banner and Halloween Popkut Frog

                           Above are the newly released  Treat Bag and PopKut Halloween Frog 


My frames are the tombstone pattern with a mat.  I used Bo-Bunny stickers I bought a few years ago for my title.  I added a few bows and candy pieces into my bag and done! 

Judy Tesla Stark-

Wednesday, September 26, 2012

Happy Halloween Banners


The Halloween Banner series are now available

  I made these using heavyweight cardstock, ribbons, chalk and added a few rhinestones. The banner pieces above are 11 inches in width each and 3 designs will make a nice size banner. Perfect to hang over an average 36" size window.  Average time per banner was around 30 minutes, even with a 6 year old helping me! 

 To assemble the pieces: I used my small hole punch and punched the holes out for my ribbons to go through.  You want your ribbon tied, but not to the point your banner can't move at all.  After I finished with my ribbons, I ran my cord through the back.  At each point where the ribbon is tied, put your cord through as you would if you were threading a needle.

  Below are close-ups of some of the designs used out of this series of eleven.


This banner comes with the die cut pieces needed to add to the shoes.  I added bows and rhinestones. 


I added rhinestones to the with hat trim and quickly chalked the broom for more dimension.  I pulled the main cord down so you can see what I used.


These diecuts can also be used for card overlays, cut with vinyl for party accessories 
or on your windows for decoration. 


Thank you for stopping by my blog!

Judy Tesla Stark

Wednesday, August 22, 2012

File Box with Folder and Index Cards

 
                                                          File Box with Folder and Index Cards
                                                                          Judy Tesla Stark

   I made this file box to accessorize my Grandson's chalkboard box I made for him.   My file box measures 5 inches high by 7 inches wide.  Nice large size to keep reports, appointments and pictures in!  The picture above is showing one of the folders and 3 index cards.  The scallop trim is designed to go inside the box to give you extra support!  Very easy file to cut out and put together quickly!

  I cut this using heavyweight cardstock.  I used 15 K/O, force 2 and speed 3.  After chalking the edges, I added some "Scrabble Tiles" for my title.

  I then colored a LaLaLand stamp and added it on the back of the box.  I plan to add a few sayings for skateboarders after I find out what they are???  Enjoy!!

Tuesday, August 14, 2012

"When I Grow Up" Kindergarten CD Book


One look at this picture of my Grandson's 1st day of school, I knew I had to make him something special!!   I wish I had thought of the concept behind this but credit is due to a Pinterest crafter.  I personally think the idea is fabulous and also quick to do.  

 First, "The Picture."

Now the idea!!  I used the CD Folder pattern
 
Diecuts used were the Bosskut Apple and the Clip Board.  I used heavyweight cardstock and made my folder 3 inches by 3 inches.  I also cut a rectangle 4 inches long by 2.10 inches wide for my tab insert.


I printed a postcard size of my photo and placed it on the insert tab.  The apple is for his teacher to write a sweet message (we hope) about Cash at the end of the school year!
You could add his school picture on the back of the insert tab or inside folder.  I would add a journal page for you as his Mom or Grandmother with significant occurrences. Awards, sports or first girlfriend/crush etc.  
You make one of these for each school year and present to your child when he graduates!!!!  What a wonderful and meaningful idea!!  


                                                          Bosskut Apple and Clip Board


Front Cover

I cut a 2.75 inch square for my cover and then used the Bosskut Gazelle pen feature to write the titles. I added the ribbon, chalked my paper and then added glitter to the name title.  This is an easy level project and completed within 30- 45 minutes.  When I finish the other 11 folders, I will put into a box and give to my daughter to keep up with the pictures and information needed.  Remember, take those
 1st day pictures of your child ! 

Judy Tesla Stark


Sunday, August 12, 2012

ABC School CD Folder Book

ABC CD Folder Book by Judy Tesla Stark
 

It's back to school tomorrow in Central Florida!!  Special blessings to all of the Teachers tomorrow....

I made another CD folder book using this beautiful Graphic 45 paper.  I used the CD folder pattern.  I first cut my folder pieces.  Using my 12 inch mat, I can make a 5.5 inch square book as the pattern is 2 pieces.
I attached my front cover ribbon using 2 way 1/8" tape and then added a coat of Mod Podge over the front cover. 


I then cut 3 of the Scalloped Bottom Tag by Judy Stark.  These tags are great for this type of project as you can put 4 different pictures onto the tag or journal and pictures.  When I cut the tags, I did not cut the circle out of the top of this tag.  I then cut my frames and chalked these. 


The stamp I used is also by Graphic 45.  I added the button and my project is completed!! 

Judy Tesla Stark
 

CD Folder Tag Book

CD Folder Tag Book by Judy Tesla Stark

I believe every family has at least one person who loves to research Genealogy. I had a Great Aunt who took the time to save me newspaper clippings and share her stories of our family. Being in my 30's at the time, I guess I should have listened more closely and appreciated her time more? I realize this now as I am trying to keep our family history organized.


Six months ago, I was with one of my daughter's and her daughter at the children’s hospital. The Doctor asked about our family heritage in reference to where our great grandparents were born, what country etc. I was quite surprised I was being asked and more so that my answers needed to be correct for her diagnosis. So… it is not only important you know what caused a death but also where did your family come from.

Making this type of family book is perfect for you to share with your children and siblings. Hopefully, it will exist in your family for hundreds of years.


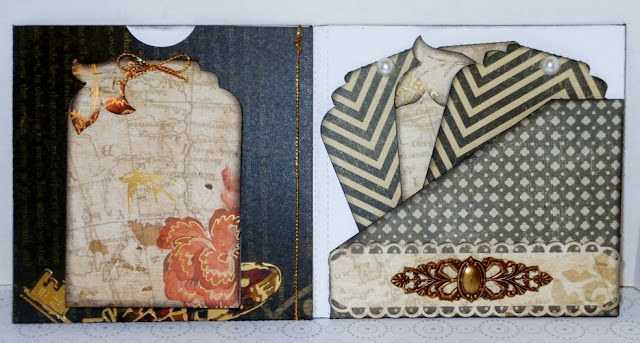
I designed and then cut the cd folder using my Bosskut Gazelle.  On the left side of the above photo: I added the Bosskut design Leaves # 0698 and attached a golden string ribbon.  For the right side: I cut 3 tags and a Bosskut card band lace # BKD093.  


I chalked all of my paper embellishments, added the 2 pearls and applied the bronze charm onto the card band. 


Each of my tags in the folder section can hold 4 - 3 inch by 3.5 inch photo's!  I can also add journaling.
 A total of 15 photographs and I will also add a CD in the CD holder section on the left side!  There are many free websites to start your research in Genealogy.  I plan to burn a cd with all of our family tree information.

Judy Tesla Stark  - Bosskut Design Team

Thursday, June 14, 2012

Baby Shower Banner

                                               Baby Shower Banner by Judy Stark


 At last!  A few, free time days to design some files and scrapbook. With a large family and what seems like endless celebrations, I decided to design a banner file.
 I cut this using my Bosskut Gazelle, the 4 back pieces measuring 6 inches wide at the top. I used reversible cardstock and used 2 full sheets. I then cut the inner frames, reducing to size around 5 inches at the top. My letter used are 2 inches tall and used cardstock.

I chalked around my inner frames, placed and applied these to each piece using two way tape. I added my letters using 2 way tape also. The brands I use are Copic and Sookwang. Now to assemble!

I folded the top back at the kiss cut line and placed my cord across the four banner pieces. I only used a 3 inch strip of tape in the middle of each piece as these  are light weight. Then I added ribbon.  you can have your banner ready to hang!!


Sneak preview of other designs coming soon !


                                    Judy Stark- Bosskut Design Team
   

Thursday, May 31, 2012

Presley Goes Hollywood Layout by Judy Stark


                    Presley Goes Hollywood Layout by Judy Stark

  Presley and her Mom flew from Orlando to L.A. last month and between us, Presley was better traveling than her Mom, Kimberly!  They had turbulants on the return flight that were quite intense at times. My daughter Kimberly spent her time instant messaging me "When is this going to end? Am I going to die?? etc. Presley proceded to put her hands up in the air as she would on a roller coaster saying ,"Whoa.. that was rocky!!." So, some of the other passengers decided to do as Presley while Kimberly fell to pieces!


On to my layout....  I wanted this to be a fun type layout and decided to design my own background paper first.  After printing it, I was ready to put my Bosskut Gazelle to work. I used the lattice frame and cut those to size. I also cut the card band file. I then designed the titles in my Funtime program and print and cut those.  I imported my jpg of the LaLaLand Traveling Marci into my Funtime and used the personal path method to import Presley's luggage pattern onto the stamp.


To finish up, I added ribbons, some glitter and stamped.  I feel I kept this fun and as you can see, Presley decided she was a Rock Star and Movie Star!!

Judy Stark-

Saturday, May 26, 2012

See You Soon Card by Judy Stark

                                              See You Soon Card by Judy Stark

 Happy Memorial Day to everyone.  Today, I wanted to make a card quickly for a friend who is visiting me soon.  I felt like a child again making this card, as it reminded me of the "Paper Dolls" phase I went through when young !!!  Seniors can have paper dolls too. Right???

  I used LaLaLand's digital "Traveling Marci" stamp. I then took my stamp/colored image and glued to the outer frame I already cut and to my card front. I added a ribbon and a little glitter to the title and I am done!
 
  So basically, I imported a copy of the paper I wanted to co-ordinate Marci's accessories with.  My paper used is from designer Susan Winget at K&Company.  I use the Funtime scheme selector feature all of the time for print and cuts. This tool imports all of the colors of your paper into the color bar with just a click of the button!  After I imported the printed parts onto Marci, I was then able to use my color bar to add the solid pieces.  I then added my title and printed my frame.  All I needed to do then is color the face,hair,bow and skin.  Super fast and I can save this and print anytime again.  I like to add a little shading to the printed image to give it some dimension.
 
I hope you enjoyed reading about this technique as much as I did using it!
 
Judy Tesla Stark-