Monday, December 20, 2010

HOLIDAY JOURNAL

  I made this as a wedding gift but you can also make this for the holidays.  To make the flower, you will need vellum paper,white marking pen (my favorite is Uniball Signo UM-153) and rhinestones.  The Motif used was designed by Karen Taglia,. This journal can be finished within an hour!
 
  You will use your embossing blade and mat.  Convert your WPC file by using the ENGRAVING feature.  This will give you the lines for embossing.  I used Island for this one.  We have Engraving/Embossing tutorials on BK forum.  I used a force of 3 and 2 passes.  Vellum will rip if too much force is used.  Be sure your mat is sticky! 
  After removing from mat, take your white outline pen and just follow the embossing lines on THE BACK of motif.  After the white (or any color) dries, it's time for the rhinestones. I used a wand/iron and individually set mine. Add ribbon and stem. 

 
Cut inside of journal pages out and attach between cover and back .  I used organza ribbon but you can use brads if not a thick book.  Sorry I can't locate final pictures......


Thursday, December 2, 2010

PRINCESS CHALKBOARD AND WALL VINYL

This is something I made for my grand - daughter "Presley".  She is a 2 year old who loves to write but also wants to stay right next to her Mommy.  The vinyl chalkboard Princess Mirror is 3 feet in length. Perfect for her to stand or sit in her chair to write/draw.  Boss kut sells the vinyl and chalkboard vinyl. http://www.bosskut.com/. They also have Chalk Ink wet wipe markers that are fabulous!  Don't forget the rhinestones for her crown. 


What Princess ever leaves her home without a mirror?  I made this 2 sided chalkboard  mirror for her to have when she is not at home.  I cut this using .20 chipboard and covered with my cardstock. The solid side of her mirror is made using BK glitter cardstock. My settings used for my Gazelle were: 3 force and 25 knife offset.  1 pass!!  In the handle of my mirror, I added 2 jumbo paper clips to give it some additional strength. I used 2 way adhesive tape to apply the clips.  Enjoy!

Potpourri / Gift Box


Need a fast gift idea?  This is a Lattice Box design by Terri Mouw that I love to make!  I fill these with Potpourri and set on a table.  I use a lot of essentials oils and this is perfect to refresh my potpourri without it touching something directly and leaving marks. Also good to put candles in or whatever you need


I always use heavyweight double sided cardstock.   You want double sided so you don't have to cover the inside.  I cut this on my Gazelle force 2 and 1 pass. Fold on the dotted lines and glue.  On this Holiday Box, I added  a magnet on the front, rhinestones and faux silver embossed corners. You can decorate this in so many different ways and have this project done within 30 minutes! 
Judy Stark                                                  

Saturday, November 27, 2010

Ornament Box


This is a gift box I made for my ornament. The basic box pattern is in our Funtime Blue Book.  I then cut an oval for the front and back side to open it up. Cut the sides into a lattice and then lined the sides and bottom with red glitter paper.  Ornament now ready to give as a gift! you could also add a battery power tea light under the ornament and use as a decoration for the holidays.
 Judy Stark -

Friday, November 26, 2010

Holiday Christmas Ornaments


Tree Ornament: I cut the outline frame using Clear Craft Plastic .020 wgt. . I set my knife offset to 40, force at 5 and used my deep cutting blade. I cut 4 passes. I then used BK Gold Glitter paper to cut the frame/background. The tree is chipboard with sookwang tape and Basil glitter. I added embossing glue to the tree and sprinkled more glitter on it for added dimension.
   I like the .020 wgt plastic sheet for tree ornaments, but also used the .007 wgt.plastic for my stocking and snowman.  You don’t need the added weight for cards and Gazelle cuts .007 at Force 3 , and one pass. The size of the ornaments are 3.5" by 3". 
 Adding the glitter paper gives it plenty of additional weight.  The snowman and stocking are also BK patterns.   


Sunday, November 7, 2010

Thanksgiving 2010 Scrapbook Layout


The time is here to get out all of those fabulous rich color papers of fall! My layout was made with our upcoming Thanksgiving dinner as my subject. Surrounded with my loved ones and as always; too much food!
 
                                                                  
Page 1 of my layout is a Thanksgiving wreath which I will use also on a few Thanksgiving cards. I used the BK designs: Paisley Bird # 0329D, Oak Leaf #0449D, Flower #0695D and for the Frames: Vintage Tag 2 # 0836D. I use these designs quite often and consider them “must have basics” for my library. Please notice the flower used and what a perfect design to add to your Christmas designs!
                                                                           
Page 2 additional designs used: Platter of Turkey # 0889D, Pie #0482D and the Fancy Daisy 0616D. I made my Turkey and Pie using thick Mulberry paper which my Gazelle cut easily using the adjusted blade holder and a setting of 4, force of 3 and one cut. Make sure your mat is cleaned, sticky and use 1 O-Ring or set the holder up just a tiny amount as you would use for a pen. I used 35 for my knife offset setting.
                                                                      

Judy Stark

Wednesday, October 13, 2010

CELERY CITY T-SHIRT AKA “ALICE”

                                                 CELERY CITY T-SHIRT AKA “ALICE”


The small town I have lived in most of my life, was once known as the "Celery Capital of the World". When you say Central Florida, most people think Disney and orange trees but Sanfordites say “Celery”. So I made this t-shirt for my sister in law as a gift and have to admit, gee... why didn’t I stick to an orange? Lol


Directions using basic vinyl are posted on my previous write up “Flower T-Shirt so please refer to that post. Materials used: T-Shirt, iron on vinyl and rhinestones. I used the green, white, black, red, metallic silver and glitter pink vinyl. I iron my layering pieces one at a time. Just like scrapbooking with glue but now you are ironing the pieces together. When using the gold or silver metallic, decrease iron setting first. The vinyl is a little thinner but wow, it’s beautiful! The cost factor for making this shirt was around $5. Remember, you are using a small amount of your vinyl at a time, not whole sheets. Example: Celery, Cupcake or Title.  I have to warn you: making your own t-shirts is addictive!!!

Judy Stark


Monday, October 4, 2010

SPOOKY HALLOWEEN LAYOUT


Before we know it, Halloween will be here and little goblins will be ringing our doorbells. I used the BK Victorian tag for my layout mat. The left side of my layout has plenty of space to add more tags. I used the Skelton Tombstone 0841D for my tags, journal card and picture frames. That cheerful ghost is Pumpkin Ghost 0498D. I used the Skeleton head from the Skeleton Tombstone pattern individually on my frames. To finish it up; add those rhinestones to the skulls! Behind the Spooky mat is room to also add a CD or extra pictures. When I do a journal or layout, I always write a “private note” in hopes my children or grandchildren one day will see it and smile. Just an extra touch…….
Judy Stark
 

Thursday, September 30, 2010

FAMILY ANCESTRY BOOK


This week I started on a Family Ancestry Scrapbook. Another hobby of mine is genealogy and even though I have available many pictures & records: they sit in a box. How many of us can remember an adult trying to tell us about our family history? I didn’t pay a lot of attention back then, but wish I had now. This project can’t be done in a day, but one page or layout a month will soon get it finished. What a great gift to pass on to your children!


 The frames in my layout are from the Framette Florette Design CD. I used the BK Scroll Border #0360D. From my border, I have border and corner accents! I used the BK Leaves #0698D to accent my border pieces. To give the leaves an antique look, cut with gold paper and then chalk with brown. This type of layout is great for using some of your trinket items you been waiting to use. Happy Crafting! Judy

Tuesday, September 21, 2010

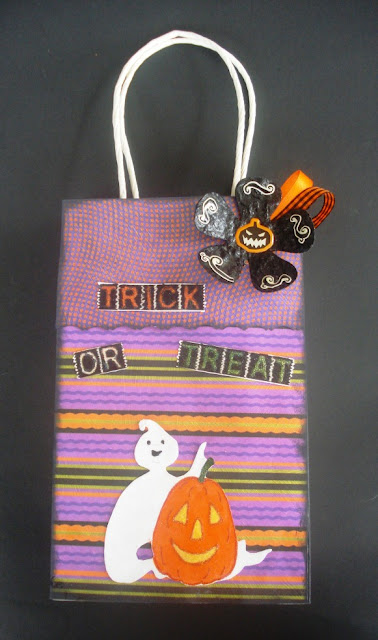
TRICK OR TREAT BAG

 
 Halloween is in 6 weeks and it's time to start making some crafts for my Grandchildren.  This trick or treat bag is so easy to do. You could precut the pieces and have your children/grandchildren make it with you.  I love the holidays and scrapbooking fast and be done projects!


I made this Trick or Treat bag starting with a premade white bag. I then cut the background pieces to cover the front of my bag. The ghost and pumpkin used is the BossKut design # 0498D – GhostPumpkin. You can adjust the sizes accordingly to the size of the bag you are using. Since this bag is for my granddaughter; I had to have a flower or glitz on it!

 
The Halloween flower is very easy to make using the thick Mulberry black paper. I cut the flowers on my Gazelle using the same settings as you would for light weight chipboard. Be sure to use a clean slightly sticky mat and just wash your mat in warm water after cutting. The flower pattern is the #0504d-large fifties flower which I use often for gift bags, layouts and cards. The pumpkin and flourish added are plastic stickers I added to the flower. Add a bow and some glitter and your done!


Monday, September 13, 2010

French Fancy Layout


  Hello everyone!  I wanted to keep this layout simple but fancy and not take away from my subject photographs. You always want your embellishments to accent your subject, not overpower it.

Since this beautiful girl has curly hair and the iron work in photo was swirly, I just added swirly accents such as the frame and embellishments. 

I hope you enjoyed looking at my layout and it inspires you to scrap away! Check out our embellishments and frames at www.scrapcuts.com.

 A very special THANK YOU to the parents of this beautiful girl and Tesla Photography, Lake Mary, Fl  for permission to use their photo's. 

Judy Stark