Saturday, December 17, 2011

Holiday Christmas Ornaments


The first ornament (with the tree) is a frame from Boss Kut Flourish and Framette CD. I highly recommend this Design CD as the patterns can be used for multiple projects! The Christmas tree is design # 0868D. Rhinestones also purchased at Boss Kut.


Tree Ornament: I cut the outline frame using Clear Craft Plastic .020 wgt. . I set my knife offset to 40, force at 5 and used my deep cutting blade. I cut 3 passes. I then used BK Gold Glitter paper to cut the frame/background. The tree is chipboard with sookwang tape and Basil glitter. I added embossing glue to the tree and sprinkled more glitter on it for added dimension. I then chalked out the outer frame using the gold metallic liquid Chalk Ink pen I ordered from Bosskut.

I like the .020 wgt plastic sheet for tree ornaments, but also used the .007 wgt.plastic for my stocking and snowman. You don’t need the added weight for cards and Gazelle cuts .007 at Force 3 , and one pass. The size of the ornaments are 3.5" by 3".

Adding the glitter paper gives it plenty of additional weight. The snowman and stocking are also BK patterns. www.bosskutdiecuts.com/


Judy Stark  - Bosskut Design Team
                                   

HOLIDAY HAT with RHINESTONES


I started out with full intent of making a card or layout with this beautiful rhinestone design but….. I was so pleased with the outcome; I decided to keep it for myself. Not quite the spirit of giving, but boy oh boy, does it sparkle! This rhinestone pattern is one of the bkdesigns. I used 10ss and 6ss rhinestones. I cut the design with my Gazelle settings at K/O zero and force at 3. I used Boss Kut’s #10050 Rhinestone Template Material. This template material is thicker than other brands and I highly recommend using it. I handset the stones since I was using so many colors and sizes. I put in the solid color stones first then added the mixture of colors. After I finished with the rhinestones, I put transfer tape over them and ironed the design onto the cap. Iron an extra 15 seconds since the fleece is thick; to be sure they are attached and even. I will be wearing my mine, but what a nice gift for Mom or Grandmother.


                                                  Happy Holidays to all! Judy Stark                                                            

CIGAR BOX PHOTO BOX


I  used a "wooden cigar box" and covered with Graphic 45 paper, added rhinestones, lace, ribbons and a rose.
 
HAPPY HOLIDAYS TO ALL !!      JUDY STARK


PHOTO BOXES

 
Need a quick gift?  These photo boxes are fast to make and I usually make a few extra ones "just in case."  So convenient to store your photo's and separate them without taking up so much of your storage space.   I am all for keeping photo's on your phone and hard drive but you CAN'T SCRAPBOOK THEM that way!  I still like to print out several of my photo's and put into the above type box.  Below is another one I made.  Great to add charms, buttons and ribbons etc. 

 
I cut these using my Gazelle and just taped the sides and you decorate accordingly.  Since  I was thinking photo's...   I made this box for my daughter.  She can store the boxes or whatever she wishes inside!  
Judy Stark

Tuesday, December 6, 2011

CARDSTOCK HOUSE - HOME DECOR


I made this decoration using heavy weight cardstock, rhinestones and print n cut feature on my Gazelle.  I used an open box pattern from my 3d shapes within the bluebook from my Funtime software.  Funtime software is included with the purchase of your Gazelle and may I add, the most recent version.  I made my own top using cardstock and vellum paper.  I also designed the lattice using my Funtime software.  Below is a photo of the top.


I used the Christmas Mouse by Lisa Schmidt , Lamp Post and Singing Dog by Karen Taglia , Bk Christmas Tree   ALL of the above are print and cuts using my Gazelle. I just freshened them up a little using my Copic markers.


The cute Reindeer Girl is Marci by LaLaLand Crafts. I colored her previously and scanned into my software to reduce the image to 1.5 inches! I used a battery powered candle light for inside my project. These are fun to make and my Gazelle did all the work involved! Below is the finished project which I now have displayed in my living room for the holidays. Judy


Chalkboard Vinyl Craft Box


Some projects are just too much fun some days than others.  This is one of those projects!  My almost 5 year old Grandson (Cash) loves to craft and I made this for him as a gift.  I used a 10 inch by 8 inch cigar box and covered it with cardstock. 
The cardstock I used is heavy 100 wgt already coated.  I cut my top, sides, strips, tag, title and monkey using my Gazelle.  I used the BK Monkey  by Lisa Smitdh.  The knobs are from a local hardware store.
                             

Now to the inside. I used the heavy wgt chalkboard vinyl.


    Framed around it in ribbon and done!  I made the chalk case and little goodie bag with his picture, using the print and cut feature in my Funtime software.  I am sure Cash will cherish this for years.
        

Sunday, December 4, 2011

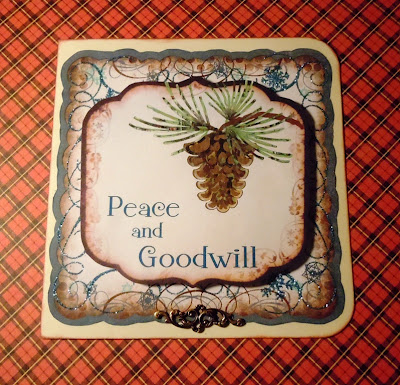
PEACE and GOODWILL Card


This is a print and cut combo card. I used the newly released Pinecones file. I made the inside frame by designing the layout and printing/cutting with my Gazelle. This file includes a SVG, jpg, WPC, GSD, AI.

After cutting my print and cut, I added a little more color with my Copic markers. Chalked the edges, matted it to the background frame and added the metal flourish.

PRINCESS CHALKBOARD


This is something I made for my granddaughter "Presley". She loves to write!  The vinyl chalkboard Princess Mirror. Pattern available at www.scrapcuts.com
  This post originally was published last Christmas but we get so many requests for this, I decided to post again.  


What Princess ever leaves her home without a mirror? I made this 2 sided chalkboard mirror for her to have when she is not at home. I cut this using .20 chipboard and covered with my cardstock. The solid side of her mirror is made using BK glitter cardstock. My settings used for my Gazelle were: 3 force and 25 knife offset. 1 pass!! In the handle of my mirror, I added 2 jumbo paper clips to give it some additional strength. I used 2 way adhesive tape to apply the clips. Below some other variations I made.  Enjoy!


The one above was for her 30 year old Mother. (my Daughter)  Never to old I guess?


REINDEER GIFT BAG

                                                  
   Another fast, fun and easy project for the Holidays!  I cut with my Gazelle,  a bag 5.5 inches by 3.5 inches, cut the Bosskut Reindeer and attached it to the front of the bag.  You have many bag and box free designs in your Funtime software under shapes 3-D in the blue book.  I then stamped my Christmas sentiment and added ribbon.
 Now ready for a holiday gift, treats or coal ?     

LAYOUT - I BELIEVE


What can I say about making this page but fun, fun, and more fun!
The Angel is a LaLaLand stamp 
The paper I used is BoBunny "Walking in a White Wonderland" and I loved using these colors!


Happy Holidays

By Judy Tesla Stark
 

Sunday, November 20, 2011

Happy Thanksgiving Card

 
   The pinecone design has been released this week!
  A basic 4.5 by 5.5 pattern was used for the card.  I used my Gazelle pen feature with my glue pen inserted to write the title on my card.  My favorite glue pen to use is the Quickie Glue. I let my machine write on my card, then put micro glitter on it. I am a fan of Ritz Glitter and the burnish technique. I cut the delicate pinecone with basic cardstock and then colored in some highlights. 
   So I have my card ready, grandchildren's surprise from Grandma treat boxes, turkey napkin holder, and cupcake wrappers done for Thanksgiving. Time to start cooking??? I hope everyone has a wonderful Thanksgiving full of love, family and blessings!  HAPPY THANKSGIVING!

Judy Tesla Stark
 

Sunday, November 13, 2011

Happy Birthday Samantha !!

 
 It seems lately, I am rushing to get family cards finished in time to give?? So today I decided my grand-daughter Samantha would have her card made by Grandma! Since I started scrapbooking a few years ago, my family now takes the time to have my grandchildren make me cards. What a treasure to receive and show them later in their lives.

This card is a side step card, which the pattern can be found easily by using Google. The beautiful Princess is another LaLaLand stamp. 

Thank you for stopping by my blog and I hope everyone has a great week! Check back often as we are getting ready to display Christmas projects I hope you will enjoy!

Judy Tesla Stark


Sunday, November 6, 2011

Give Thanks Fall Layout by Judy Stark


This layout was so much fun to make! So easy to get creative with the great Bo-Bunny Fall line of paper and LaLaLandCrafts . Pine Cones with branches designed by me.


The adorable Pilgram boy is a newly released LaLa Land stamp. 


  The "Give Thanks" title was made using my  Gazelle PEN feature. You don't need a special attachment to use this feature. Just remove blade and insert your pen or marker. I used a PrismaMarker which is quite large, but you can use a regular ball point pen if you choose. The pen feature is one of my favorite features on my Gazelle.
  I then cut the flower design from another sheet of cardstock and applied in the bottom left corner. I glued the bottom and left side. I now have a pocket to put a copy of the CD of photo's taken during the holidays.
I made journal cards and will add descriptions on them.
 

Thank you for stopping by my blog and I hope everyone has a great week!

Judy Tesla-Stark


Friday, October 21, 2011

Fall Layout by Judy


Fall is starting for us in Florida, at last! The only changing of color in leaves here in a few months will be from green to brown. So I grabbed a sheet of the newly released BoBunny Fall line and have color everywhere! I usually don't recommend papers but this line is beautiful and it cuts so easily on my Bosskut Gazelle. 1 pass using force 2. The adorable Pilgram boy and girl are newly released LaLa Land stamps.Visit store and click on Digi's.  http://lalalandcrafts.blogspot.com/p/customer-gallery.html  I colored them in using my Copic markers and in case you don't know, Bosskut now sells these products under craft supplies at http://www.bosskut.com/   Check them out!


The frames used are the BK Triframettes. http://www.bosskutdiecuts.com/triframette.aspx  I will add my title or journaling onto the smaller oval frame after I decide which pictures are going on this page. I then cut a couple flourishes and added a few pearls on them. Enjoy!


Judy Stark

Bosskut Design Team Leader

Sunday, October 2, 2011

Lattice Box and Top Gift Card


 The lattice top and box card may look time consuming but it isn't.  The hardest part is deciding which paper you want to use!  I made this card for a special someone and inside the gift box, a special unexpected gift. The pattern for the card will be available in a few days at http://www.bosskutdiecuts.com/ .  A very versatile card as you can fill the box up with flowers,candy or gift boxes. 
      Above is the basic card excluding the pearls and rhinestones, that is in your pattern.  I cut 2 of the lattice tops in different paper as I like the effect.  I used 85 wgt paper and my Bosskut Gazelle:  cut at force 1, speed 2, K/O 12. 1 pass! I have a new sticky clean mat, so force 1 is perfect. I generally cut everything on a speed of 2 except  circles and squares.  After you have cut the pieces, chalk around the kiss cut lines and then glue/tape the  box and top pieces to your card base.  Then apply the lattice pieces to your window if you want the inside frame lattice.  
I then cut a basic candy box pattern and envelope. Envelope is perfect to write a personal message inside. I added a small bow and a few pearls and my card is completed! 

Judy Tesla Stark
Bosskut Design Team Leader


Saturday, September 24, 2011

Pumpkin Pickin' Layout

 Fall is in the air (even in Florida) and it's time to get out your nice richly colored paper.
 The layout I made is a very basic design. I rarely do 1 photo layouts as my family is large and I want to do layouts of everyone and occasions. First I cut my title border, title and 3 basic frames for my page.

                                      
      Embellishments used are:
BK Pumpkin -
Oak Leaves -
Spider Daisy-
Set of Curly Scrolls


THANK YOU for stopping by my blog!!

Judy Tesla Stark


Monday, September 5, 2011

Get Well Awning Card

  This is a easy card to make and perfect for someone who is in the hospital or long term care.  You could use other items inside the open box area such as; cough drops, mints and candy. Design your own boxes and write funny sayings on them!
   I cut the basic card pattern, open box top pattern and lattice top using my Gazelle. The tag was made using my pen feature to write on it.
  

The card pattern is 4.5 by 5.5 inches and tag is 1.75 inches.  Below is the side view.  I cut 2 of the awnings to add dimension and color.
Just add flowers into box area or goodies and this makes a perfect card to give.  This may look hard to make but it isn't!  I think the hardest part was finding which flowers to add. :)  Thank you for stopping by my blog and I hope everyone is having a good week. 

Judy Stark


Sunday, September 4, 2011

Spider Web Witch Window Card

Another spin off of an awning card type.  Perfect card to have sitting out on your table, desk or classroom.  Pattern available at www.scrapcuts.com

I designed the spider web awning to use during the Halloween season.  Again, basic card pattern with an open top box aded to the bottom, a top and window cut out.  I stamped the Halloween sentiment. 
   Easy to make and fun.  Halloween is in the air....

Have a good week and thank you for stopping by my blog.
Judy Stark
 

BEWARE Halloween Card


This is a regular 4.5 x 5.5 card with a window cut on it and an open top box attached.

 
                                                  Beware of the Frank Peeper! by Lisa Schmidt
 
There is enough room to add 1 or 2 regular sized  boxes of candy in the box section.  Perfect for a child, teacher or neighbor!
Judy Stark
 

Trick or Treat Boxes

Do you need boxes for Halloween treats for your family or a classroom?  I used the bag, oblong candy box and pillow box patterns.


These are perfect to add mints and candies that might otherwise need a bag or wrap. Everyone likes candy corn etc and these are perfect for them!

Judy Stark
 

Haunted House Card

This was a fun card to make! 
I first cut a regular 4.5 by 5.5 inch card .  I used the Bosskut Haunted House pattern #0486   I grouped the pieces together and welded it with my Funtime program. Excluding the house roof edges and fence. (I cut those pieces separately) I then made a small open top box and welded the haunted house to the top of the box. 
I glued the box using sookwang double sided tape and attached to the base of my card front.  I used  the dimensional foam squares to attached the top part of the house.
I then added different cardstock to the backs of the windows and doors.  Added the witch, skull, ghosts, fence  and house ledges.  A dimensional Haunted House card ready to mail!  Following is a close up:
Judy Stark
 

Friday, August 26, 2011

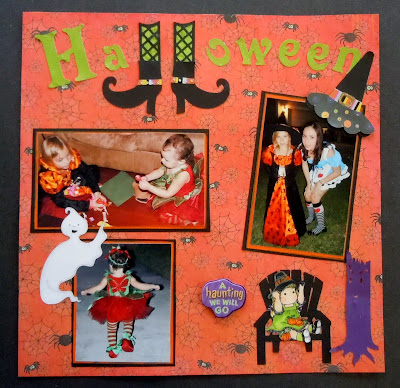
Halloween Layout

 
This is a layout I did today using digital cuts and some preview digitals soon to be released.
The ghost, chair and tree plus many other Halloween files are available at 
 
digital cutting files come in a SVG, jpeg, WPC, AI, PDF and GSD files!!

 
 The stamp is Magnolia, "Tilda"


 Popcut Bat,Witch and Skull Gate.  Can you tell Presley was a STRAWBERRY last year? ha
I think she was more into those pacifiers ! 
Everyone have a good weekend and thank you for stopping by my blog!
Judy Tesla Stark