Tuesday, August 14, 2012

"When I Grow Up" Kindergarten CD Book


One look at this picture of my Grandson's 1st day of school, I knew I had to make him something special!!   I wish I had thought of the concept behind this but credit is due to a Pinterest crafter.  I personally think the idea is fabulous and also quick to do.  

 First, "The Picture."

Now the idea!!  I used the CD Folder pattern
 
Diecuts used were the Bosskut Apple and the Clip Board.  I used heavyweight cardstock and made my folder 3 inches by 3 inches.  I also cut a rectangle 4 inches long by 2.10 inches wide for my tab insert.


I printed a postcard size of my photo and placed it on the insert tab.  The apple is for his teacher to write a sweet message (we hope) about Cash at the end of the school year!
You could add his school picture on the back of the insert tab or inside folder.  I would add a journal page for you as his Mom or Grandmother with significant occurrences. Awards, sports or first girlfriend/crush etc.  
You make one of these for each school year and present to your child when he graduates!!!!  What a wonderful and meaningful idea!!  


                                                          Bosskut Apple and Clip Board


Front Cover

I cut a 2.75 inch square for my cover and then used the Bosskut Gazelle pen feature to write the titles. I added the ribbon, chalked my paper and then added glitter to the name title.  This is an easy level project and completed within 30- 45 minutes.  When I finish the other 11 folders, I will put into a box and give to my daughter to keep up with the pictures and information needed.  Remember, take those
 1st day pictures of your child ! 

Judy Tesla Stark


Sunday, August 12, 2012

ABC School CD Folder Book

ABC CD Folder Book by Judy Tesla Stark
 

It's back to school tomorrow in Central Florida!!  Special blessings to all of the Teachers tomorrow....

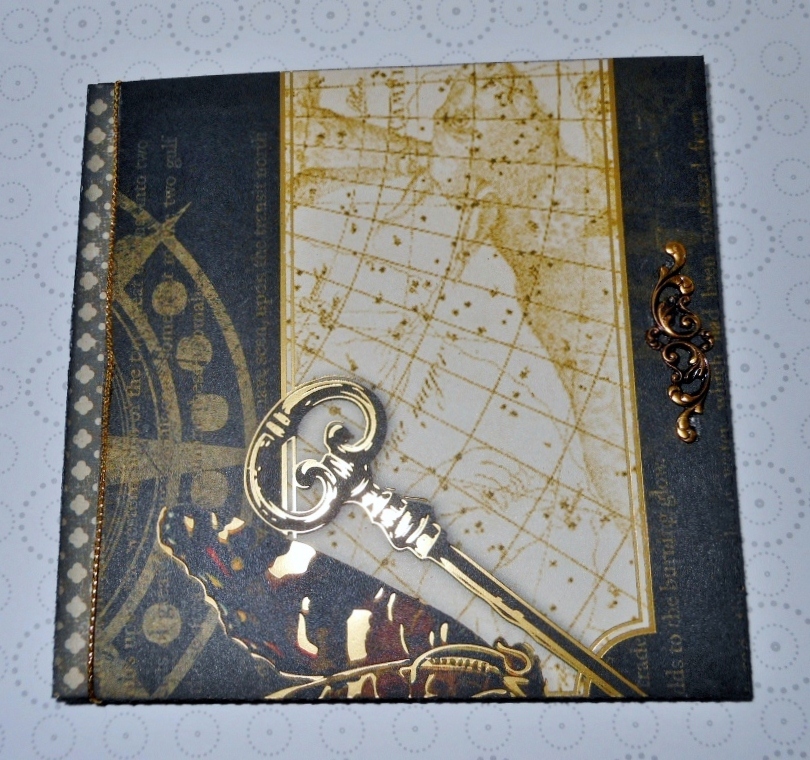
I made another CD folder book using this beautiful Graphic 45 paper.  I used the CD folder pattern.  I first cut my folder pieces.  Using my 12 inch mat, I can make a 5.5 inch square book as the pattern is 2 pieces.
I attached my front cover ribbon using 2 way 1/8" tape and then added a coat of Mod Podge over the front cover. 


I then cut 3 of the Scalloped Bottom Tag by Judy Stark.  These tags are great for this type of project as you can put 4 different pictures onto the tag or journal and pictures.  When I cut the tags, I did not cut the circle out of the top of this tag.  I then cut my frames and chalked these. 


The stamp I used is also by Graphic 45.  I added the button and my project is completed!! 

Judy Tesla Stark
 

CD Folder Tag Book

CD Folder Tag Book by Judy Tesla Stark

I believe every family has at least one person who loves to research Genealogy. I had a Great Aunt who took the time to save me newspaper clippings and share her stories of our family. Being in my 30's at the time, I guess I should have listened more closely and appreciated her time more? I realize this now as I am trying to keep our family history organized.


Six months ago, I was with one of my daughter's and her daughter at the children’s hospital. The Doctor asked about our family heritage in reference to where our great grandparents were born, what country etc. I was quite surprised I was being asked and more so that my answers needed to be correct for her diagnosis. So… it is not only important you know what caused a death but also where did your family come from.

Making this type of family book is perfect for you to share with your children and siblings. Hopefully, it will exist in your family for hundreds of years.


I designed and then cut the cd folder using my Bosskut Gazelle.  On the left side of the above photo: I added the Bosskut design Leaves # 0698 and attached a golden string ribbon.  For the right side: I cut 3 tags and a Bosskut card band lace # BKD093.  


I chalked all of my paper embellishments, added the 2 pearls and applied the bronze charm onto the card band. 


Each of my tags in the folder section can hold 4 - 3 inch by 3.5 inch photo's!  I can also add journaling.
 A total of 15 photographs and I will also add a CD in the CD holder section on the left side!  There are many free websites to start your research in Genealogy.  I plan to burn a cd with all of our family tree information.

Judy Tesla Stark  - Bosskut Design Team

Thursday, June 14, 2012

Baby Shower Banner

                                               Baby Shower Banner by Judy Stark


 At last!  A few, free time days to design some files and scrapbook. With a large family and what seems like endless celebrations, I decided to design a banner file.
 I cut this using my Bosskut Gazelle, the 4 back pieces measuring 6 inches wide at the top. I used reversible cardstock and used 2 full sheets. I then cut the inner frames, reducing to size around 5 inches at the top. My letter used are 2 inches tall and used cardstock.

I chalked around my inner frames, placed and applied these to each piece using two way tape. I added my letters using 2 way tape also. The brands I use are Copic and Sookwang. Now to assemble!

I folded the top back at the kiss cut line and placed my cord across the four banner pieces. I only used a 3 inch strip of tape in the middle of each piece as these  are light weight. Then I added ribbon.  you can have your banner ready to hang!!


Sneak preview of other designs coming soon !


                                    Judy Stark- Bosskut Design Team
   

Thursday, May 31, 2012

Presley Goes Hollywood Layout by Judy Stark


                    Presley Goes Hollywood Layout by Judy Stark

  Presley and her Mom flew from Orlando to L.A. last month and between us, Presley was better traveling than her Mom, Kimberly!  They had turbulants on the return flight that were quite intense at times. My daughter Kimberly spent her time instant messaging me "When is this going to end? Am I going to die?? etc. Presley proceded to put her hands up in the air as she would on a roller coaster saying ,"Whoa.. that was rocky!!." So, some of the other passengers decided to do as Presley while Kimberly fell to pieces!


On to my layout....  I wanted this to be a fun type layout and decided to design my own background paper first.  After printing it, I was ready to put my Bosskut Gazelle to work. I used the lattice frame and cut those to size. I also cut the card band file. I then designed the titles in my Funtime program and print and cut those.  I imported my jpg of the LaLaLand Traveling Marci into my Funtime and used the personal path method to import Presley's luggage pattern onto the stamp.


To finish up, I added ribbons, some glitter and stamped.  I feel I kept this fun and as you can see, Presley decided she was a Rock Star and Movie Star!!

Judy Stark-

Saturday, May 26, 2012

See You Soon Card by Judy Stark

                                              See You Soon Card by Judy Stark

 Happy Memorial Day to everyone.  Today, I wanted to make a card quickly for a friend who is visiting me soon.  I felt like a child again making this card, as it reminded me of the "Paper Dolls" phase I went through when young !!!  Seniors can have paper dolls too. Right???

  I used LaLaLand's digital "Traveling Marci" stamp. I then took my stamp/colored image and glued to the outer frame I already cut and to my card front. I added a ribbon and a little glitter to the title and I am done!
 
  So basically, I imported a copy of the paper I wanted to co-ordinate Marci's accessories with.  My paper used is from designer Susan Winget at K&Company.  I use the Funtime scheme selector feature all of the time for print and cuts. This tool imports all of the colors of your paper into the color bar with just a click of the button!  After I imported the printed parts onto Marci, I was then able to use my color bar to add the solid pieces.  I then added my title and printed my frame.  All I needed to do then is color the face,hair,bow and skin.  Super fast and I can save this and print anytime again.  I like to add a little shading to the printed image to give it some dimension.
 
I hope you enjoyed reading about this technique as much as I did using it!
 
Judy Tesla Stark-


Thursday, May 24, 2012

Graduation from Pre-K Layout by Judy Stark


                    Graduation from Pre-K Layout -  by Judy Tesla Stark

  Graduation time is upon us!  Cash is officially a "Little Man" now as he leaves Pre-K to enter Kindergarten next year. So congratulations and Grandma actually got your special page done in time!
   After selecting my colors and papers for this layout, I cut the frames. The fun begins!


 I really enjoy coloring stamps to use for my projects!  This is one of the newly released LaLaLand stamps Graduation Luka.  


I then cut my Bookworm file and the clipboard using my Gazelle.

 Files : Book Worm by Olivia Myers  and  Clip Board by Olivia Myers  .  I used the clipboard pattern for my largest frame. 
 After placing and assembling my pieces, I added ribbon for the trim. 

Judy Stark-  

Tuesday, May 1, 2012

HIP KID Layout by Judy Stark


Time for me to catch up with my monthly layouts and am I ever behind! 

I started with cutting my mats for my layout using my Bosskut Gazelle.  I then used the text feature and added a star between my words and welded these together.  I cut my title and now ready to put the layout together.  I used and colored a freebee digital stamp offered by Anne F. a few months ago on the "Outlawz Group" and a LaLaland Cowboy Luka stamp.  I then added ribbon, my grandson's name, the date and I am done!  A basic layout I am sure my grandson will enjoy sharing with his children one day.

Judy Tesla Stark
 

Monday, April 30, 2012

Mother's Day Step Card by Judy Stark


  Every Mother's Day my daughter Tara always gives me a special plaque or book about Mothers. I have saved all of them through the years and love to get out the box and read over again.  This year I decided to use one of the pages and recycle to her.
 I used a basic step card pattern which you can find on the internet and added the MOM to the front. It's very easy to do this in your Funtime program!  I used the text feature, break by character to separate the letters individually, click convert text to path and then used the cut path feature (Scissors) on the bottom of the letters.  Then you just move the word and lay on top of the kiss cut line and they will pop up on your card.


  I used 85 wgt cardstock using 1 pass, 12 K/O, force 2 and speed 3.  I then cut my background frames, sizing those in Funtime.  I glued the background frames after chalking the outside.  I then chalk the quote and attached it to the front of my card.

 
 I used the newly released Ruffles Butterfly design. All of our designs are created for computerized digital cutters. The digital downloads contain all of the following formats: AI, WPC, GSD, Vector PDF and a jpg for reference.
 The flower is also a newly released design "Parker PK Flower."   Remember, all of the Popcuts are one cut designs!  If you haven't cut any of these before, try them.  To finish my card, I added a sticker (Mom & Me) some faux stick on pearls and ribbon.  Enjoy!

Judy Tesla Stark -

Tuesday, April 24, 2012

Butterfly Doily Card by Judy S


Time to make some extra cards to keep on hand.  I like to make a few for last minute "I need a card" celebrations or events. Using doily designs are very popular now with card makers and so convenient to put a card together quickly. Make a few, put away until needed and stamp, write or use the fabulous pen feature on your Bosskut Gazelle to write the sentiment inside.
 
For this card, I used the Butterfly Doily and Popcut Ruffles Butterfly 
I cut the doily, butterflies, mat and card. I used the heavy weight Bazzil cardstock for everything except the doily. 
After gluing the diecuts to my card , I then added a few rhinestones, pearls and added a ribbon. Done!!


   Judy Stark - 


BUTTERFLY DOILY


PARKER POPCUT FLOWER


POPCUT RUFFLES BUTTERFLY

POPCUT LADY FROG W/BOW